-
FAQs
-
Sysrisk User Manual
-
- Step-by-Step Guide to SysRisk Purchasing Process
- Team or Enterprise License Purchase: Login and Profile Setting Process
- Password Management Process
- Company Profile in SysRisk
- User Creation and Role Assignment in SysRisk
- Customization and Dashboard Configuration
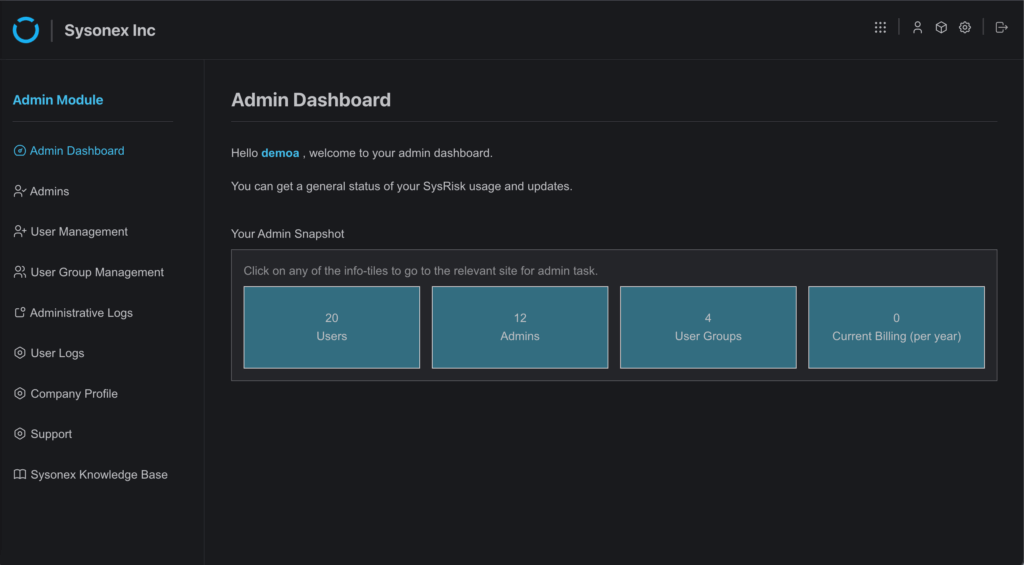
- Homepage Overview
- SysRisk Activity Logs
- Category Management for ERM
- Risk Approval Overview1
- Risk Entry Page for ERM
- Risk Entry Page for PRM
- Creating AI-Generated Risk Entries in SysRisk
- Risk Register Risk Prioritization Page Overview
- Risk Creation, Edit and Approval Process in SysRisk
- Risk Closure Process in SysRisk
- SysRisk Auditing Record Maintenance
- Risk Notification Settings
- Show Remaining Articles (3) Collapse Articles
-
-
Risk Management
-
- Control Risk
- ERM
- Inherent Risk
- Qualitative Risk Analysis
- Quantitative Risk Analysis
- Residual Risk
- Risk Acceptance
- Risk Acceptance Criteria
- Risk Aggregation
- Risk Analysis
- Risk Analysis Methods
- Risk Analytics
- Risk Appetite
- Risk Appetite Framework
- Risk Appetite Statement
- Risk Assessment
- Risk Assessment Matrix
- Risk Assessment Process
- Risk Attribution
- Risk Avoidance
- Risk Bearing Capacity
- Risk Benchmarking
- Risk Capacity
- Risk Capital
- Risk Clustering
- Risk Communication
- Risk Communication Plan
- Risk Concentration
- Risk Contingency
- Risk Contingency Plan
- Risk Control
- Risk Convergence
- Risk Criteria
- Risk Culture
- Risk Dashboard
- Risk Dependency
- Risk Diversification
- Risk Escalation
- Risk Escalation Path
- Risk Evaluation
- Risk Exposure
- Risk Financing
- Risk Framework
- Risk Governance
- Risk Heat Map
- Risk Horizon
- Risk Identification
- Risk Indicator
- Risk Intelligence
- Risk Interdependency
- Risk Inventory
- Risk Landscape
- Risk Management(RM)
- Risk Management Dashboard
- Risk Management Framework
- Risk Management Maturity
- Risk Management Plan
- Risk Management Policy
- Risk Mapping
- Risk Matrix
- Risk Maturity
- Risk Mitigation
- Risk Mitigation Plan
- Risk Mitigation Strategy
- Risk Model
- Risk Monitoring
- Risk Optimization
- Risk Owner
- Risk Ownership
- Risk Policy
- Risk Portfolio
- Risk Prioritization
- Risk Profile
- Risk Quantification
- Risk Reduction
- Risk Register
- Risk Register Update
- Risk Reporting
- Risk Resilience
- Risk Response
- Risk Response Plan
- Risk Review
- Risk Review Process
- Risk Scenario
- Risk Scenario Analysis
- Risk Scenario Planning
- Risk Scoring
- Risk Sensing
- Risk Sharing
- Risk Strategy
- Risk Taxonomy
- Risk Threshold
- Risk Tolerance
- Risk Tolerance Level
- Risk Transfer
- Risk Transparency
- Risk-Adjusted Return
- Show Remaining Articles (82) Collapse Articles
-
- Business Continuity Risk
- Capital Risk
- Competition Risk
- Compliance Risk
- Counterparty Risk
- Credit Risk
- Credit Spread Risk
- Currency Risk
- Cybersecurity Risk
- Deflation Risk
- Environmental Risk
- Ethical Risk
- Event Risk
- Financial Risk
- Foreign Exchange Risk
- Fraud Risk
- Geopolitical Risk
- Health and Safety Risk
- Human Capital Risk
- Inflation Risk
- Infrastructure Risk
- Innovation Risk
- Insurance Risk
- Intellectual Property Risk
- Interest Rate Risk
- Legal Risk
- Liquidity Risk
- Market Risk
- Model Risk
- Natural Disaster Risk
- Operational Risk
- Outsourcing Risk
- Political Risk
- Product Liability Risk
- Project Risk
- Regulatory Change Risk
- Regulatory Risk
- Reputation Risk
- Reputational Risk
- Resource Risk
- Sovereign Risk
- Strategic Alliance Risk
- Strategic Risk
- Supply Chain Risk
- Sustainability Risk
- Systemic Risk
- Technological Risk
- Technology Risk
- Show Remaining Articles (33) Collapse Articles
-
Closing a risk in SysRisk involves multiple levels of approval, reflecting the complexity and importance of finalizing a risk entry. Due to its intricate nature, SysRisk provides a dedicated page to facilitate the process, which requires input and authorization from multiple users in the risk closure workflow.
Step-by-step Guide for Closing a Risk
1. Admin or Product Admin Login
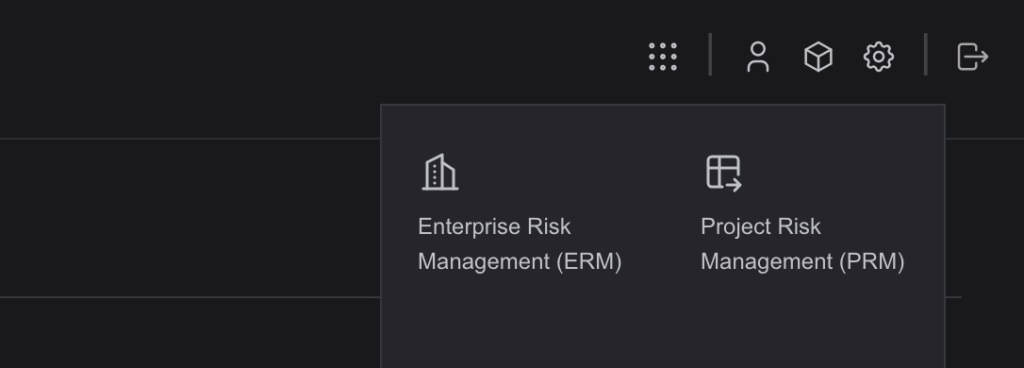
- Navigate to the Desired Product (ERM/PRM)
- Action: Select either the Enterprise Risk Management (ERM) or Project Risk Management (PRM) module after login.
Got it. Here’s the revised version in a neutral manual tone, with no reference to a person:
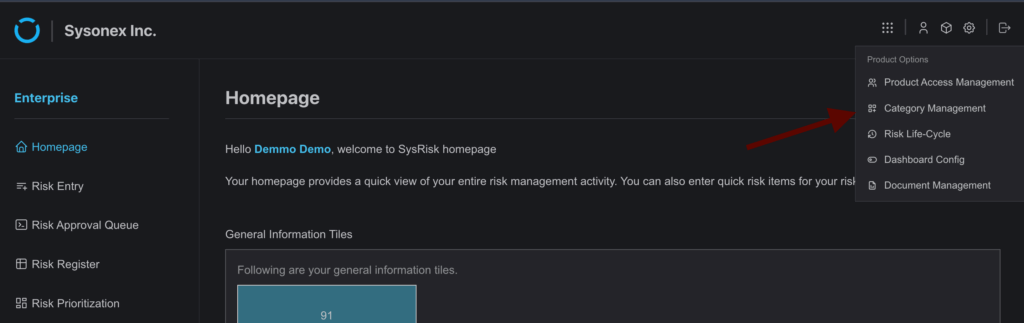
- Assign Risk Closure Access in the ERM Module
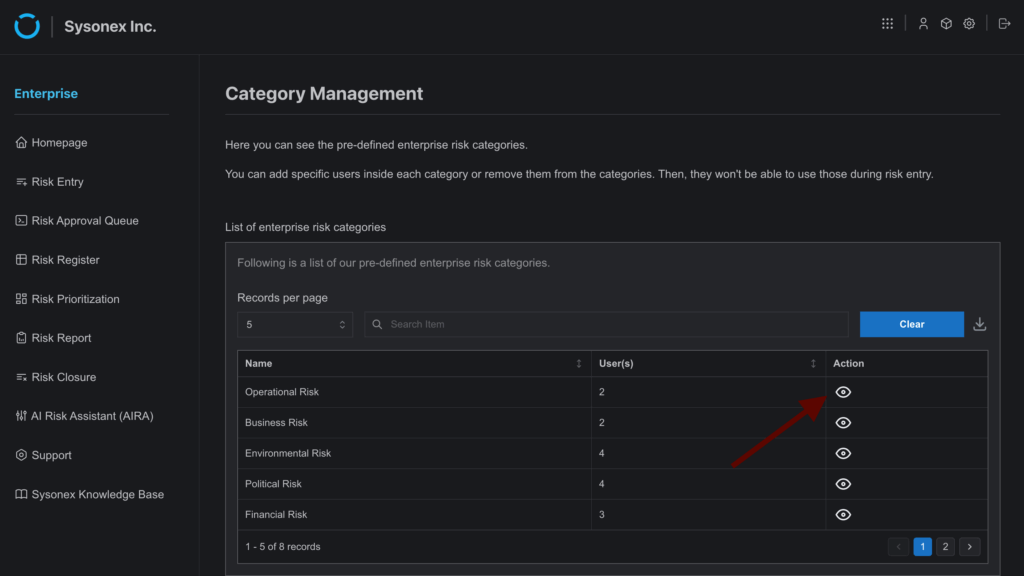
- Navigate to the Category Management page within the ERM module.
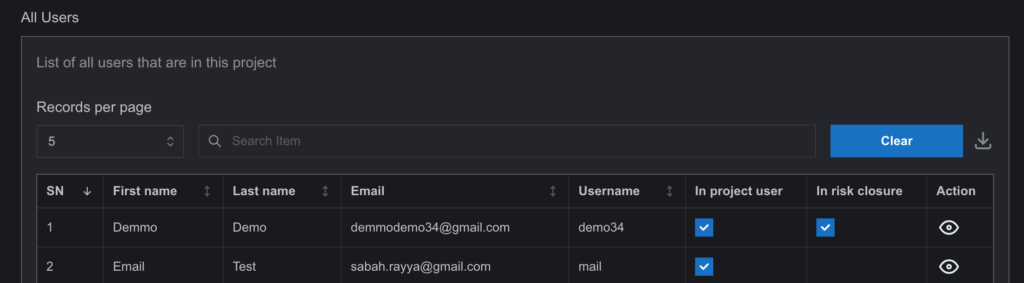
- A table displays all predefined risk categories. Locate the desired category and select the action button to open the Category Details side drawer.
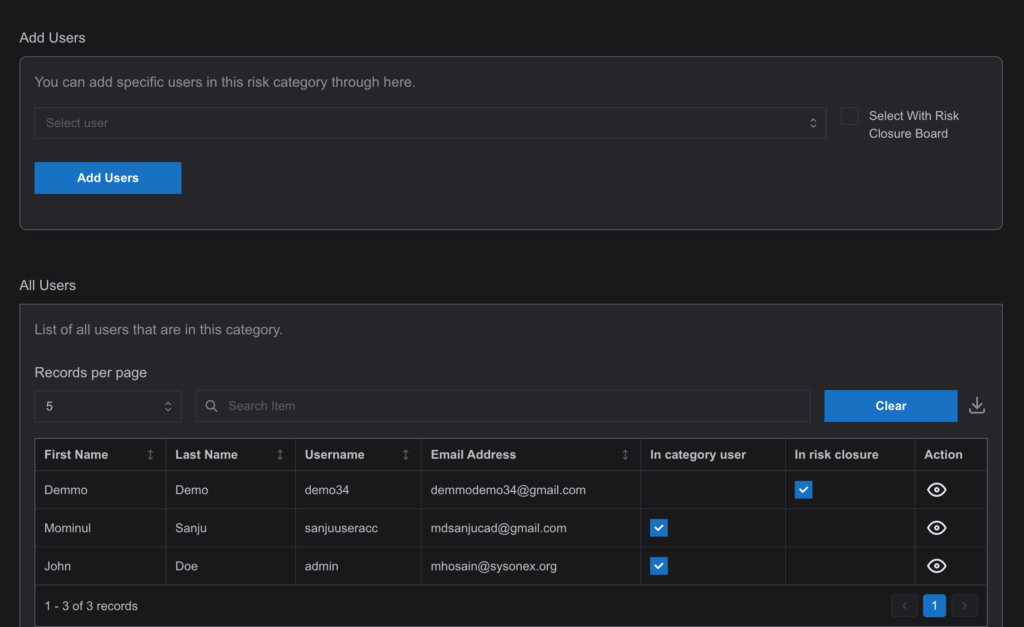
There are two methods to assign risk closure access:
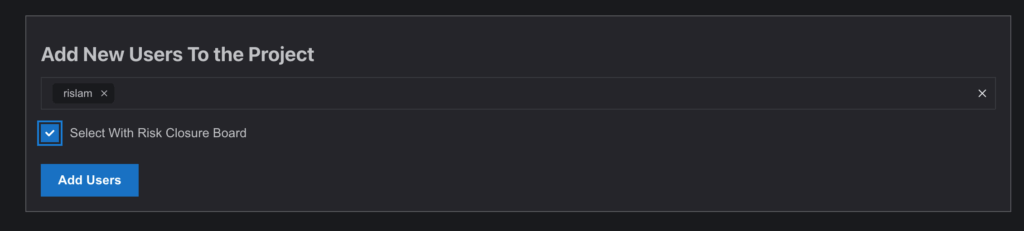
- Using the Add User Section: From the Add User box, select one or multiple users. To include closure access, check the “Select With Risk Closure Board” checkbox before adding the users.
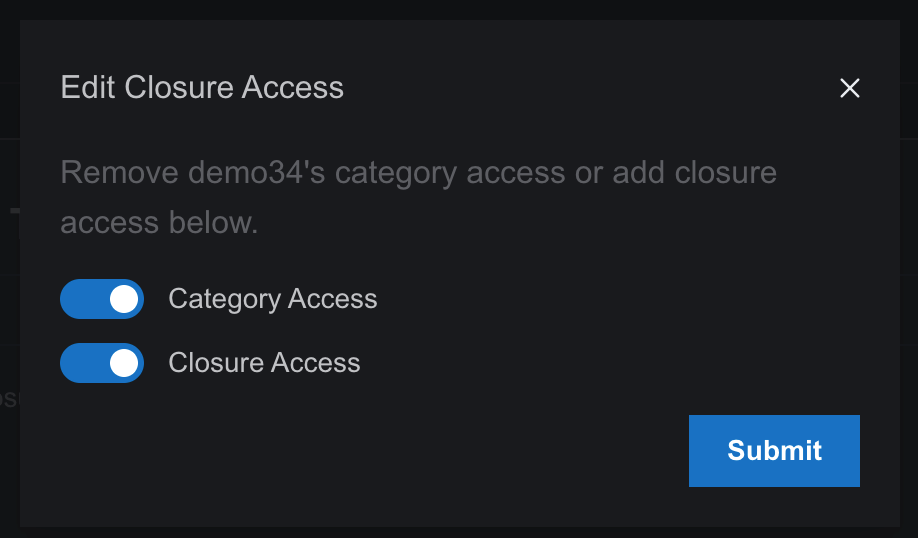
- Using the Existing User Table: The lower section of the drawer displays a table of users already assigned to the category. Click the action button next to a user to open a toggle dialog. Enable or disable Closure Access or Category Access as needed. Disabling Category Access will also remove Closure Access.
- Assign Risk Closure Access in the PRM Module
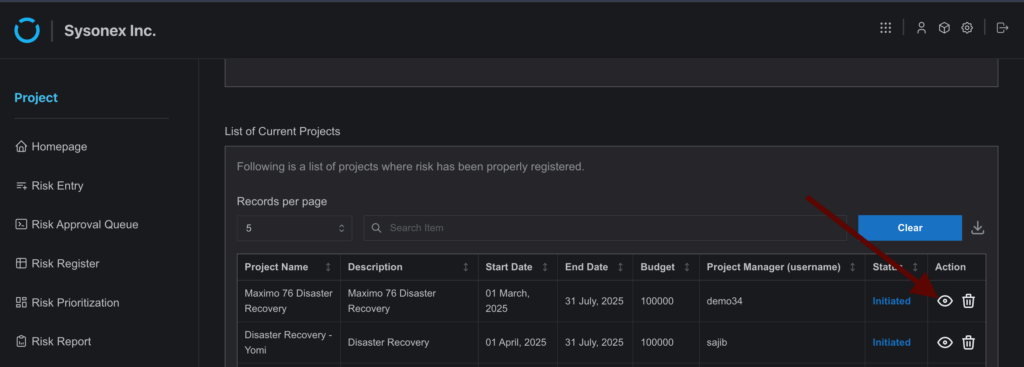
- In the PRM module, open the Project Management
- Scroll to the project list and select a project to open its side drawer.
- Expand the drawer to access the Project Details
- The following options are available:
- Use the Add User section to select users. Check “Select With Risk Closure Board” to include closure access before submitting.
- The existing user table allows editing access via the action button. The toggle dialog can be used to manage Closure Access and Project Access. Disabling Project Access will also remove Closure Access.
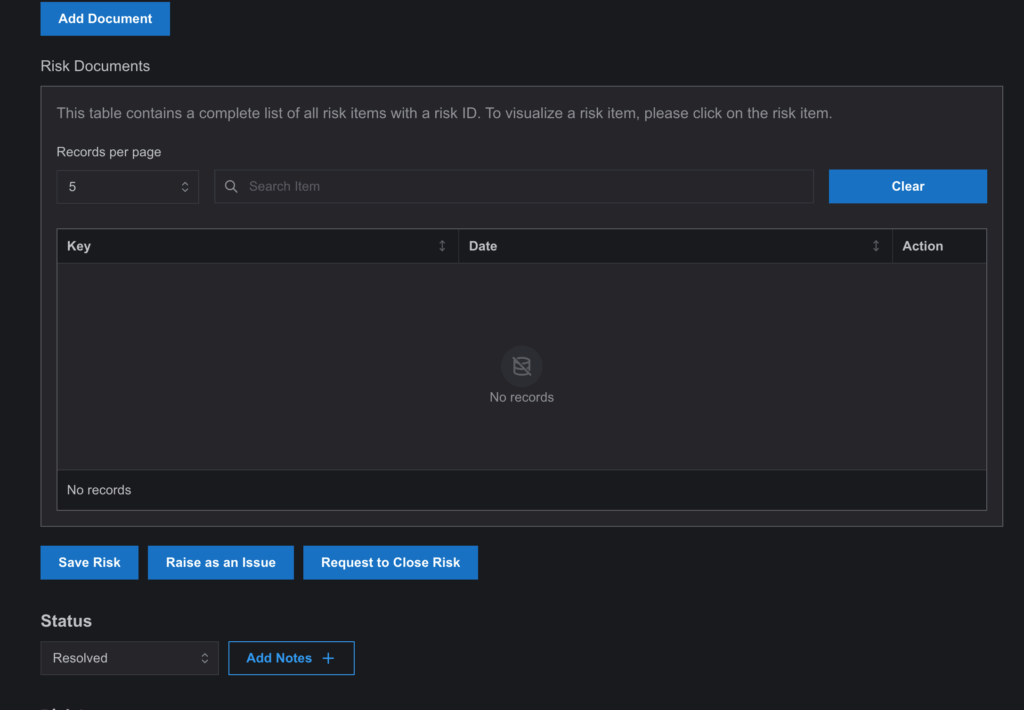
- Mark the Risk as “Resolved”
- Action: After a risk has been resolved, the user who is associated with it can mark the status as “Resolved” on the Risk Register page. Once marked as resolved, a new button named “Request to Close Risk” will appear. To start the closure procedure, the user has to click this button.
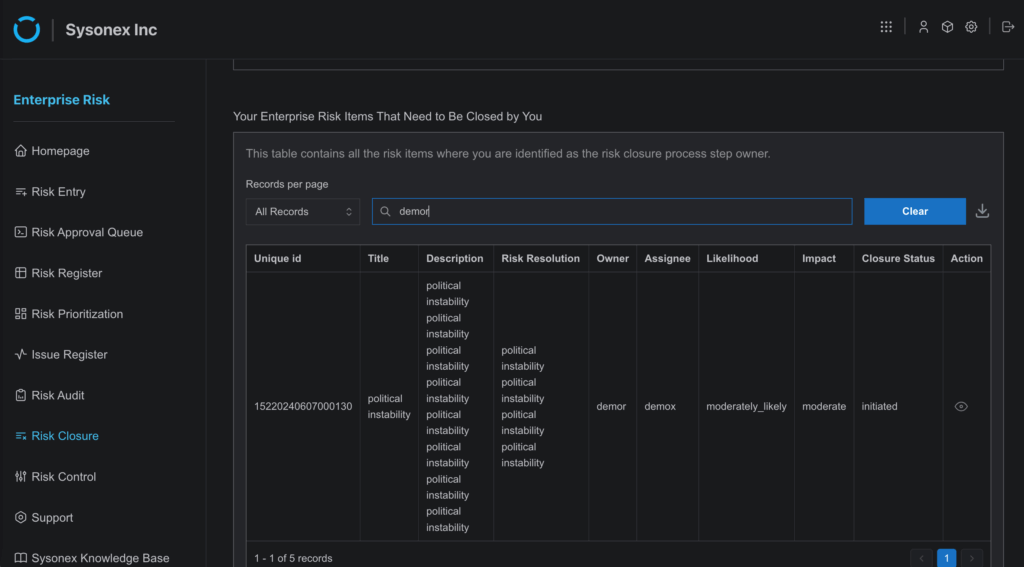
- Risk Sent to the Risk Closure Workflow
- Action: After clicking “Request to Close Risk”, the risk item is automatically sent to the users added to the risk closure workflow. The risk will appear on their Risk Closure page with an “Initiated” status, indicating the start of the risk closure process.
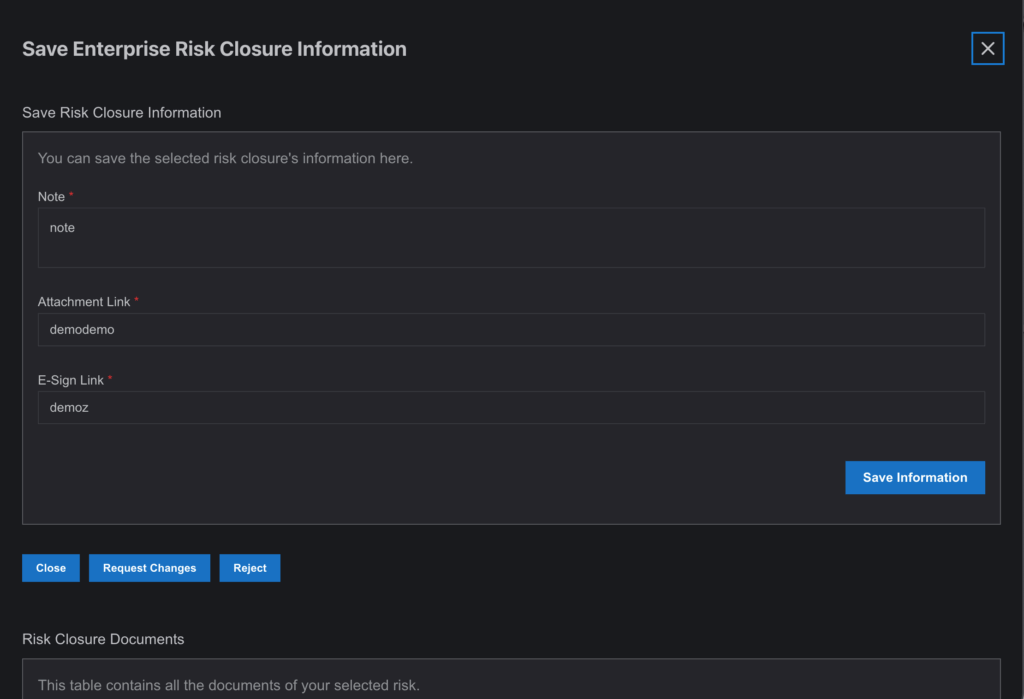
- Close, Reject, or Request for Change
- Action: Users in the workflow will now fill out a form to approve the risk closure. They have three options:
- Close: Finalizes the closure of the risk.
- Reject: Sends the risk back to the creator with a rejection.
- Request for Change: Asks the creator for modifications before the risk can be closed.
Note: If a user chooses to close the risk, the status updates to “Partially Completed” in the Risk Closure page and “Partially Closed” in the Risk Register page.
- Final Closure Process
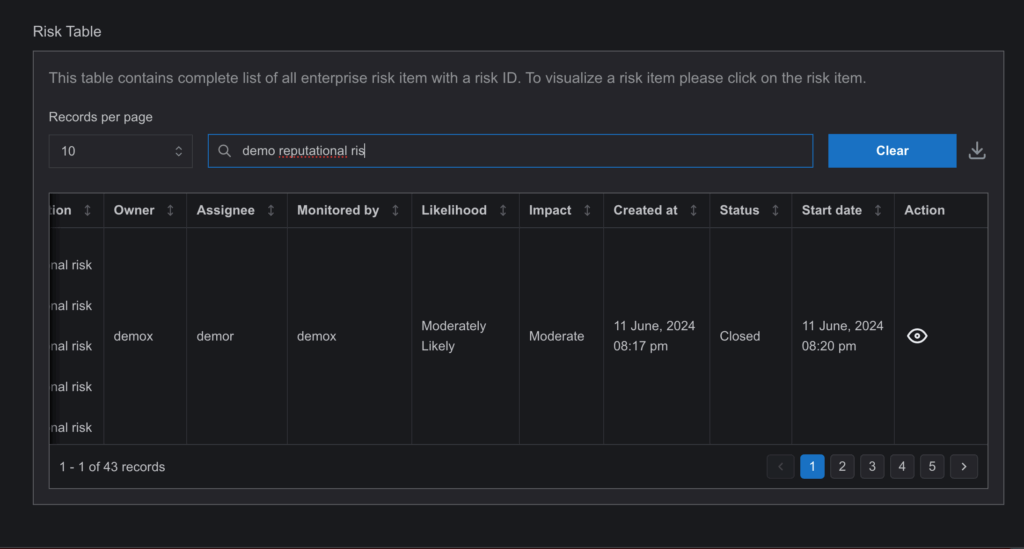
- Action: If there are multiple users in the workflow, all must complete their closure steps for the risk to be fully closed. When all users approve the closure, the status updates to “Completed” in the Risk Closure page and “Closed” in the Risk Register page.
Note: Once closed, the risk will remain in the Risk Register for several years for recordkeeping purposes.
Key Points:
- Multiple Approvals: The risk closure process mirrors the risk approval workflow, requiring multiple users to review and approve.
- Partially Closed: If only one user approves the closure, the risk status is marked as partially closed, awaiting further approval.
- Closed Risks: Once fully closed, risks are archived in the Risk Register for longterm reference.
This dedicated workflow ensures that closing a risk is as thorough and welldocumented as its approval process, maintaining integrity and accountability in SysRisk.